Currency / Audiofiles/ Notifications
We continue to understand the Streamlabs Chatbot (hereinafter – SLCB). This material is designed for the fact that you already know how to prepare the program for launch and how to install scripts. All this can be learned from my previous article.
In this guide, I will tell you in more detail about the sections of SLCB that I consider applicable and that I use myself. Things like Qoutes, ExtraQoutes (creating quotes), Queue (a queue of users), Subscribers (a list of paid subscribers), Counter (a counter, for example, of deaths in the game), and others-either clear in themselves and do not require more detailed analysis, or so specific that most of them simply do not need them.
The console
SLCB has a very convenient console that can completely replace the “Stream Manager” in Twitch, especially if you, like me, read the chat and check the event feed there.

By default, the event feed is disabled — click on the funnel icon on the right, where the list of viewers is, and put a checkbox on the Events Log.
If you use the Streamlabs service for alerts, you can use the buttons at the top (Follow, Sub, Donation, etc.) to send test alerts to check widgets in OBS and notifications in the chat (except for Bits and Raid).
Important: for this function to work, you need to make a connection to the Streamlabs service.
Currency
I strongly recommend including the currency in SLCB, even if you do not plan to use any alternative to the Twitch channel points. This will open up some additional features of the program, the most important of which I consider accounting for the number of hours viewed for each user.
Go to the “Currency ” section and turn on the toggle switch.
Subsequently, this screen will display a list of absolutely all viewers who have ever been present on the channel since the currency was turned on.
Statistics of viewing hours, accumulated points, and assigned ranks (if you add any) will be available.

At the top right is a row of icons. ‘+’ – manually add a user and assign them the number of points and hours. Pencil – edit the user’s watchtime and points. Trashcan – delete user data (useful when you need to delete the data of a bot that is hanging out in the chat-a little later I will tell you how to untie
from accounting those users that you are sure are bots). Crown — create your own system of ranks that will be assigned for a certain number of points. Gear — currency settings, this is where we need to start.

In the ‘General’ subsection, we give a name to our currency and assign a command that will inform the user about how many points he has accumulated (the parameters with the ‘$’ icon in the command response are variables – a full list of them can be found in the SLCB manual. With a certain
amount of imagination, you can use them to create very interesting and fun commands.
Here everything is clear: $username – the name of the user who used the command, $points — his number of points, $currencyname – the name of the currency). Cooldown – the time for recovery, after which the command can be used again.
«Assign ranks based on…» – on the number of which indicator the ranks will be assigned: points or hours (in the section with ranks, respectively, we already set the necessary numbers based on this).
Check-box “Take offline hours in to account…” – whether to take into account the time spent by the user on the channel outside of streams.
Check-box “Automatically become a regular at…” – automatically assign the role of Regular to the user after reaching the specified number of points/hours. In some cases, this is convenient, for example, if you want to give access to some commands only to trusted people. For more informationabout roles, see the ‘Users’ section.
The last check-box “Use Streamlabs Extension Currency” is to borrow the bot’s currency from the Streamlabs service.

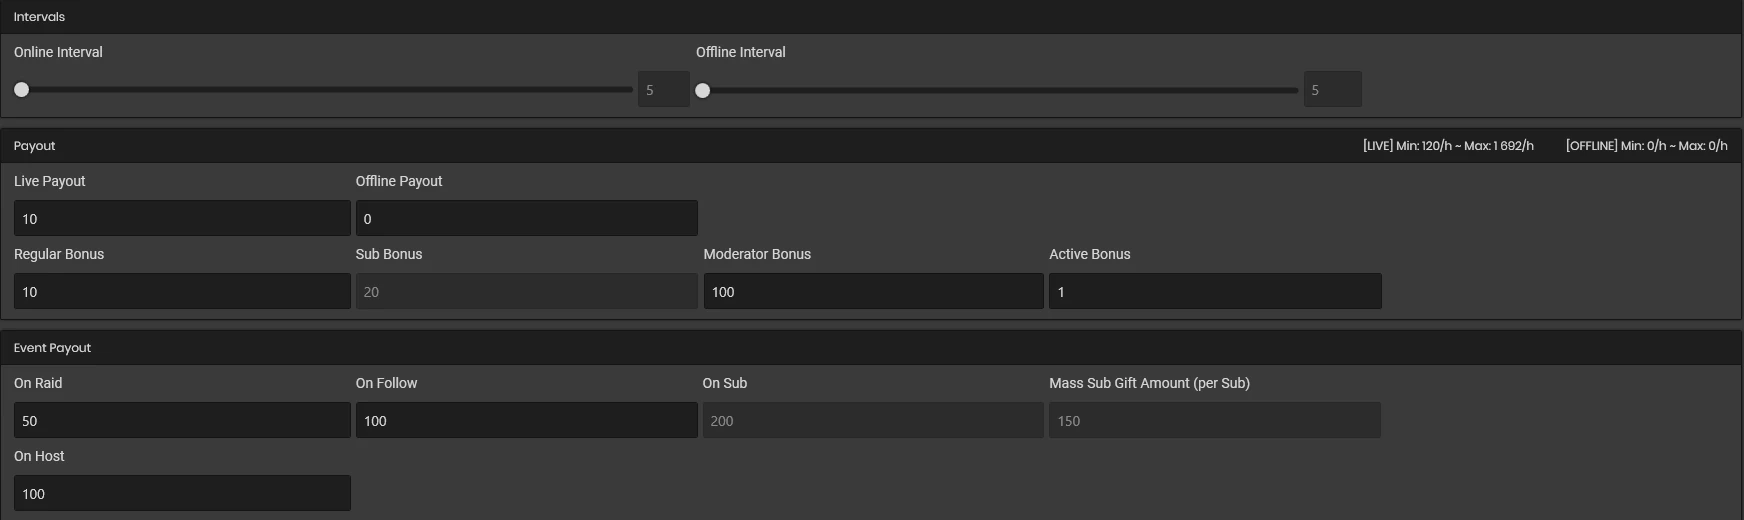
In the ‘Intervals’ subsection, set the intervals in minutes (from 5 to 60) for crediting points. Payouts – the number of points awarded. You can also assign bonuses for subs, regulars, and moderators. There is also a small hint on the right about how many points per hour will be awarded with the set
parameters. Event Payout – additional charges for a follow, subscription, host, etc.
To understand what parameters of rewards to set, you need to understand the scope of points. Whether you will link them to separate chat commands and chat games, or just to keep track of the watchtime statistics.
I set my settings at random. But to begin with, it is logical to put an interval of 60 minutes and a payout of 1 point + bonuses. The main thing is not to forget to change the default prices later in the games (if you use them).
Now you can create a command to call the list of Top viewers by the number of hours viewed. For example:
Command name: !top
Response: Top watchers $tophours(3)
Note that there are no spaces between the $tophours parameter, parentheses, and numbers. The number in parentheses is the number of people that SLCB will display on the screen.
Users
Here you can view all users who have ever visited the channel, track the date of their last visit, assign a regular, an editor (the ability to add, delete, edit commands, and so on), as well as block access to certainfunctions through a blacklist. Which we will do.
Select a user that we are sure is a bot and click on the pencil to edit their profile. In the “Blacklisted from” section, check the box “Currency” and click Submit. That’s all, now the user is disconnected from the currency accrual and will no longer prevent us from being in the list of Top viewers.
Just don’t forget to delete its statistics in the Currency section.

Why make someone a regular and why might it be necessary?
When editing a command, you can see the Permission column-and the list of roles by seniority (from top to bottom) who can use it:
Everyone
Regular
VIP
Subscriber
Moderator
Editor
Caster
The roles that are lower in the list have access to all the role commands of the roles that are higher in the list. For example, Everyone can’t use commands assigned to the Regular role, and Subscriber can use Everyone, Regular, VIP, but not Moderator, Editor, Caster.
In some cases, this can be useful to avoid unwanted spam from random guests or to motivate viewers to visit the channel more often in order to “climb a kind of hierarchical ladder” and get access to interesting teams.
Sound Files
So we got to one of the most interesting built-in features of SLCB — adding audio files and binding to a specific command/event. Actually, it was only because of this that I originally installed this program.
Everything is simple here.
Turn on the toggle switch to activate the function.

Click on the ” + ” at the top right to go to the screen with the addition of the file. After selecting our soundfile from the list, you can edit it (thepencil icon) or delete it (the thrashcan icon).
In the Name column, we give a name to our sound / command. Votes – set to zero, because this is the required number of repetitions of the command in the chat for the sound to play. Volume is the volume control.
Very convenient, the sounds always differ in volume from each other. Group-assign a thematic “folder” for the sound. The same parameter is also available in the Commands section. I recommend that you start using it as early as possible, because Over time, there will be a lot of commands, and this will help to catalog them all. You just need to type the desired name for the group in the line, and then select it from the list when creating a new command.
Click the Pick button and specify the path to our audio file. SLCB only supports mp3 format. The Preview button allows you to listen to the file with the volume set.

Click on the toggle switch “Automatically generate command” to automatically create a command (it can be found in the Commands section later and it will have the name that we set in the Name column). You can add some text to the response so that the audio playback is accompanied by a
text message in the chat or, for example, enabling the OBS source via the OBS Remote Parameters script. I advise you to set Cooldown to 0. Click Submit to save the changes and then go to the Commands section in the left menu. We find our new command there and also set Cooldown to zero. This minimizes the response of the program to the sound commands from the
chat, but still doesnt play sounds in a row, i.e. you will not be able to spam — there is still a “cooldown” time that cannot be affected.
Notifications
Let me remind you: to get notifications about events in the chat, you need to log in via a Twitch account in the Streamlabs service and make a connection through the Connections panel in SLCB. Notifications are very convenient for additional control over what is happening on the stream, and you can also write a unique message as a reaction to the event.
We turn on the toggle switches wherever necessary (Follow, Host, Subscriber, Cheers), write a message for the event (do not forget to leave the default variables $username, $targetname, $months, $bits, $totalbits, $amount, $tier in the promise, so that the bot addresses a specific person
and takes into account the statistics of bits, subscriptions, etc.). Optionally, you can add a sound: check the box in the Play SFX and select the desired sound from the list.

Oddly enough, there is no raid notification in the section. This is fixed by installing the corresponding script https://github.com/Kruiser8/Raid-Notify (to download from github, click on the green Code button and download Zip).

Install the script, as described in the previous article.
Select our new script from the list in the Scripts section and also write our message in the Custom Reply line. Note that the parameters here will look slightly different: {name} name of the raider, {count} number of raiders, and {game} category in which the raider streamed. And specify the minimum number of raiders for the notification to work.
Then there is a subsection that stores information about the last raid, test notifications, and a Readme file with instructions in a separate file.
Do not forget to click Save Settings to confirm the changes and reload the scripts with a special button at the top right of the screen with a rounded arrow.

That’s all for today. Next time, let’s look at the script and the features of OBS Remote Parameters and auto-shoutouts, including a script that will allow you to display them via a widget on the screen.
Don’t be afraid to learn new things. And don’t try to do everything at once. Little by little, step by step. You will not even notice how quickly all this will be ready and how easy it will be to stream with these tools.