
Preface
Attention! This article describes the principles of setting up and working of the ffplayout python script version 3.5.x
The developer stated that version 4.0 is the latest in python, and in the future the code base will be replaced with the Rust programming language.
UPD: And also, I switched to Liquidsoap - https://mikulski.rocks/lofi-stream-24-7guide/
The idea of making my own radio (which broadcasts a playlist with videos 24/7) appeared a long time ago. It was logical: for a couple of years of streaming, 4.5 hours of jam-improvisations (highlights) accumulated, which I edited in such a way that they could sound like independent songs (cutting out chat communication and gluing successful loops together). The advantages of this idea were also bribed: the created content does not lie idle, it is convenient for the community (at any time you can go to the channel and listen to music without leaving Twitch), well, the prospect of attracting a new listener due to constant presence online.
The task itself was as simple as possible: there is a folder with a bunch of mp4 files whose playback order needs to be shuffled, looped and broadcast. Well, ideally, so that when adding new files, you do not need to restart the stream, but this does not matter. No technological frills: low bitrate and resolution, because the main emphasis is on sound, not on the picture and no overlays, because they are useless.
It was clear that a virtual private server (VPS) was needed for such purposes, because a physical PC working around the clock at your side carries a lot of inconveniences. On a VPS, as a rule, it does not have a pre-installed graphical shell and all system management takes place via the command line, so it will not work with a couple of clicks to install OBS and launch a VLC playlist there. In general, an ignorant person (such as me) neither in programming nor in system administration will have a hard time.
It took a long time to make a working project. It took a lot of time to search for tools, trials and errors with picking at what was found. But everything worked out.
In order not to waste the time and patience of those people who understand the technical aspect, I will first briefly tell you about the necessary script. After that, I will proceed to a detailed description of all the steps and nuances, trying to give clear instructions for those who have never dealt with scripts and virtual private servers at all. Well, at the very end, a detective story about the path I have traveled.
ffplayout
ffplayout – this is a set of tools in the form of Python scripts, which is focused on playing video files 24/7.
The core of the script is the ffplayout_engine . It is processes files/playlists and outputs them to the broadcast. ffmpeg is used to output the stream, which already knows a lot by itself (decode, convert, glue various audio/video formats together and even output files to stream), but it does not provide broadcasting of the file list (as far as I understood), therefore an additional script is required.
Because of these features of ffmpeg, a similar and more popular python script pylivestream , which can also take a list of files from a folder and loop it, restarts the stream for each (!) file
ffplayout_engine works in such a way that two ffmpeg instances are launched, the first of which prepares files, and then sends them to the second instance, which already performs the final compression and sends it to the stream, working continuously. Thus, an infinite broadcast is obtained.
To make it all work, you need to install python 3, ffmpeg, the script itself (following its instructions) and edit the file ffplayout.yml, substituting its values in certain lines and run the script with the necessary arguments. In theory, that’s it. But I had one problem that caused an error, so I had to edit another file. But more on that below.
All other scripts from the bundle somehow expand its functionality.
For example, playlist-generator generates playlists in json format, which are necessary for the playlist playback function. However, they can also be created manually. In any case, I don’t use playlists, so you’ll have to figure out this toolkit yourself.
And the combination of ffplayout-api and ffplayout-frontend can even allow you to control the script through a web browser and a graphical shell in it. But, of course, you will have to sweat with the settings. In my case, I don’t see the need for this.
Well, those who know and can, can go install the script and try it out. And I’m moving on to a more detailed tutorial. And first of all, you need to understand which VPS configuration is suitable for this purpose.
Choosing a VPS
There is a huge selection of providers on the market that offer VPS rentals and all tariffs are plus or minus the same. The more expensive, the more power they give us to use. As a rule, they offer ready-made configurations, and in some cases, you can choose the components yourself. The main features are as follows:
- The number of CPU cores – the more, the higher the performance. This means that the bitrate and resolution of the stream are higher. Decoding a video stream is very demanding and heavily loads the processor.
- RAM – you don’t need a lot of it and 1 GB (even 0.5 GB) is enough for our purposes.
- Hard disk space – is a very important factor! My playlist, with a running time of 4.5 hours and 720p resolution, takes 5 GB (with an average bitrate of 3000 kbs), and in 1080p – all 11 GB. Plus, you should take into account about 2.5 GB that the operating system will take.
- Outgoing traffic – as a rule, in paid tariffs, traffic is unlimited. But it is also worth paying attention to this and calculating traffic in advance if its volume is limited by a monthly limit: the number of seconds per month x bitrate = our traffic.
For example, we plan to stream in 720p resolution with a bitrate of 3000kbps (3 mbps):2592000 seconds per month X 3mbps bitrate = 7776000mb, convert this value to Terabytes (usually traffic is specified in TB) through any online converter of values and get 0.93 TB per month. Therefore, 1 TB of traffic per month will be plus or minus enough to broadcast in 720p.
Accordingly, for 1080p and 6000 kbps bitrate, it is already necessary to look out for options with traffic from 2 TB per month.
Since I do not have a solid budget and there is no certainty that it will be possible to monetize the radio, I had to choose the cheapest option (for convenience, I chose the same provider that hosts my site – beget.com):
1 CPU (Intel Xeon 3.2Ghz) / 1 GB RAM / 15 GB storage / Unlimited traffic
This pleasure costs 330 rubles a month ($ 5) or 11 rubles (15 cents) a day.
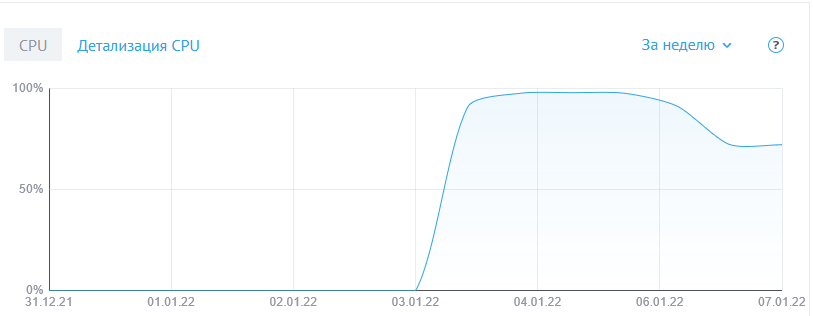
This configuration was enough to run the stream at 720p & 30 fps, but with a reduced bitrate of 2000kbps (instead of the 3000kbps recommended by Twitch) and a ffmpeg – veryfast video profile.
But! The CPU load was very high and did not drop less than 97% with periodic punching up to 100.5%. And despite the fact that this did not affect the stream in any way, I still decided to lower the resolution to 576p to reduce the load. The bitrate and profile remained the same, and the load eventually decreased to 72%.
Of course, the resolution of 1024×576 is not so great, but I still decided that the picture is less important than the sound, and a lower resolution means more coverage of devices with poor Internet and performance.
In addition, the next available tariff, of course, doubles all the characteristics, but the price doubles too. Which is simply not affordable today.
Subsequently, I managed to find a configuration to run a stream in 720p with a bitrate of 3000 kbps. All it took was to set preset to superfast mode. The CPU load in this case is 80-85%.
In general, initially a completely free option was considered. Oracle has an interesting offer Oracle Always Free. It includes a virtual machine with 1 CPU / 1 GB RAM / 10 GB storage / 10 (!) Tb of traffic. Which would be quite enough for my needs (except, perhaps, the amount of storage, but if I rerender all the files in 576p, I can win a few more GB of space). But I never managed to register: the service constantly issued an error after trying to link a debit/credit card (I eventually tried all the available cards) to the account. You should not be afraid: no debiting funds money without your consent, and if you do not go beyond the limits of Always Free services, then everything will remain free.
You can also pay attention to what the provider’s admin panel includes. I understand that the “Terminal” (that is, the command line through which the server is managed) is always present in the arsenal. A plus will be the presence of a “File Manager” – a shell like Norton Commander with which it will be convenient to upload, move and edit files in the server’s file system. This is not critical, because it will be possible to edit all the files through command-line utilities (or on your PC, and then upload to the server).
In my case, the provider gives both. But unfortunately, I don’t know how the situation is with other providers, because I have never used such services before.
Setting up a VPS
When creating a VPS, you will be asked which operating system to install.
I chose Ubuntu 20.04, so all further steps will be applied to this OS.
Come up with a name for the server (if necessary), set a password (or write down the proposed one), enable ssh (if there is such a checkbox, it is needed for the File manager to work).
After creating the server, open the Terminal in the admin panel.
Login: root (as a rule),
Password: your_password (the entered values in the password string will not be visible – this is normal, do not be afraid).
You can also connect to the server via the Windows – Powershell utility. There you will need to enter the following command:
<strong>ssh root@ip_address_of_your_server</strong>After that, enter the password and get access to the server.
But when using Windows Powershell, it is important to understand that when you close it, the script execution process will stop too! This is solved by entering a script launch command with certain arguments (I will mention this later). Or run it through the provider’s Terminal: in my case, after closing the Terminal, the process is not interrupted.
Another important point!
In the server OS, as a rule, the usual Copy-Paste combinations do not work! CTRL+C – interrupts the current execution process of the running program (which is will be useful in future). In some cases, this combination is replaced by CTRL+SHIFT+C (V) or CTRL+SHIFT+ALT+C (V). But it doesn’t always work either.
In Windows Powershell, inserting from the buffer is done with a right mouse click.
The “up arrow” key allows you to call the last command entered in the line.
First of all, install FFMPEG by entering several commands:
sudo apt updatesudo apt install ffmpeg
Following the installation process, we agree with the changes being made. FFMPEG latest version will be installed! We need version 4.2 and higher. You can check the current version using the command:
ffmpeg -v
The ffplayout script requires Python version 3.7 and higher. Usually, some Python is included in the default software bundle, but just in case, we’ll install the latest version:
sudo apt update
sudo apt install python3.9
After that, you can proceed to installing and configuring the script.
Installing the ffplayout
Following manual, attached to the script, install the script itself first:
git clone https://github.com/ffplayout/ffplayout_engine.git
The script will be installed in the /opt/ffplayout_engine directory, using the cd command we go to this directory:
cd /opt/ffplayout_engine
We need to create a virtual environment:
virtualenv -p python3 venv
And run:
source ./venv/bin/activate
You also need to install modules for the script to work correctly (in fact, they can be installed individually and not all of them may be needed, but they do not take up much disk space, and it’s easier this way):
pip3 install -r requirements.txt
Just in case, you can create a folder for the log:
/var/log/ffplayout
And the folder where our video files will be stored (however, this can also be done through the File Manager, and then upload your videos there; remember that the OS is case-sensitive in the names of files and folders, i.e. Videos and videos will be perceived as different directories):
/Videos
That’s it! The script is installed and now you can proceed to its configuration.
It should be added that you can first download the script to your PC, edit it and upload it to the server as a Zip archive and unpack it wherever you need. It will also work. But I still think it’s better to follow the recommended installation steps to avoid unexpected problems.
Configuring the ffplayout
I will clarify again! In this manual, I describe the option of looping video files from a specific folder! Files in this folder can always be renamed, deleted or added new ones without interrupting the stream*. If you need to create and alternate playlists, then you will have to learn it yourself.
*in theory, this is how it should be. But practice has shown that when adding or deleting files in a folder, the script, despite the fact that it sees all the changes, does not start working quite correctly. This is expressed in the fact that the script plays the wrong file that it was originally going to play (for example, the file title is displayed incorrectly on the screen or the playlist order is broken). Therefore, after the edits, it is still better to restart the script (in the terminal, you can call the last command entered by pressing the up arrow key – if you do it quickly, the stream will not be interrupted). However, it is likely that this problem will be fixed in new script updates.
The main file with the settings is ffplayout.yml. Open it with a text editor with edit rights in the File Manager.
If the File manager is not available in the provider’s admin panel, then you can use the built-in editor in the console using the nano command.
First, go to the script directory:
cd /opt/ffplayout_engine
Open the desired file in the editor:
nano ffplayout.yml
To save changes, there is a combination of CTRL+O, exit the editor CTRL+X
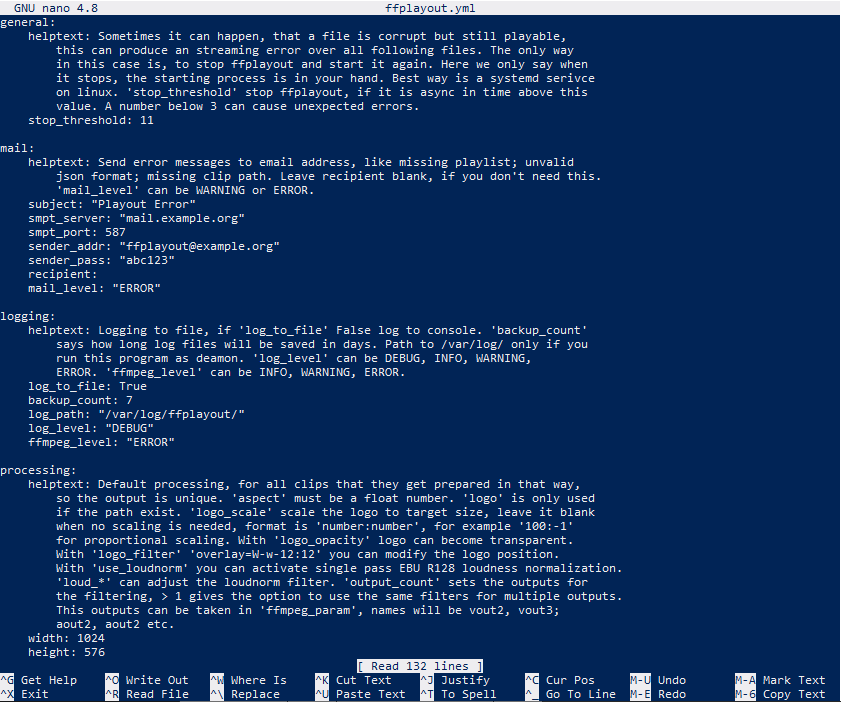
Looking for a section “processing”:
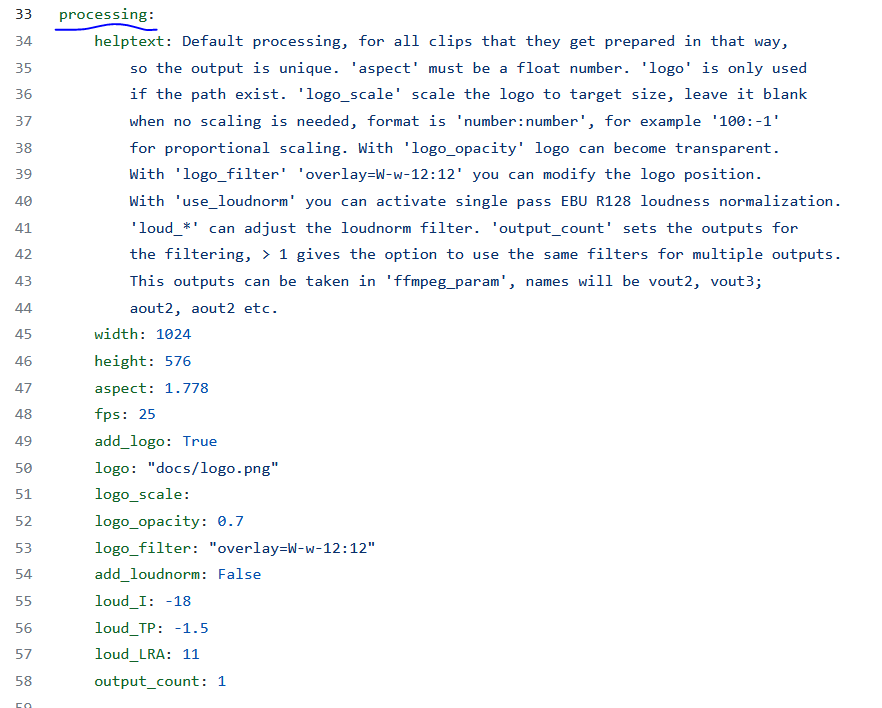
First of all, set the attributes of your video files (width, height, ratio, number of frames). For example, I’ll leave the default values.
width: 1024
height: 576
aspect: 1.778 (this is a 16:9 ratio, you can not touch it)
fps: 25
You can overlay an image (for example, a logo) on the video. The following lines are intended to control this function (however, I do not use it and it is disabled for me):
add_logo: True (can be replaced with False if this function is not needed)
logo: “docs/logo.png” (instead of “docs/logo.png” we specify the path to the desired image)
logo_scale: (by default, it is empty here; the parameter is responsible for scaling the added image in the format ‘number:number’)
logo_opacity: 0.7 (the level of transparency of the added image)
logo_filter: “overlay=W-w-12:12” (with these parameters, you can change the location of the added image)
The script also provides the ability to normalize the sound of all videos by volume by editing the numerical parameters of the filter. I don’t use it either, because my files are all about the same volume. By default, it is disabled.
add_loudnorm: False (to activate it, you need to replace it with True)
loud_I: -18
loud_TP: -1.5
loud_LRA: 11
And the last line is responsible for “using the same filters for multiple outputs”. Yes, the script can stream to several sites at once, but I prefer to use the service restream.io, just because I’m used to it and it’s easier this way. Through it I broadcast simultaneously on Twitch and Youtube.
I leave the parameter unchanged.
output_count: 1
Immediately below the processing section, there is a section playlist:
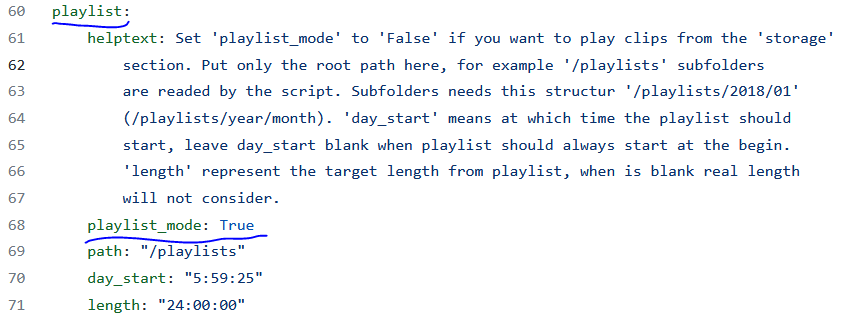
It also needs to make one edit in the playlist_mode parameter. True – replace with False. In order for the script to run files from a given folder, and not try to find json playlists.
Next, edit the section storage.
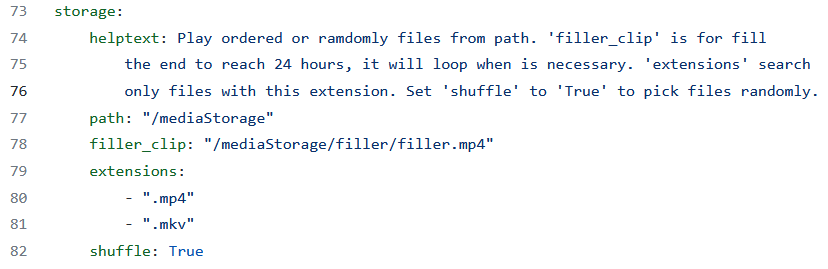
path: (here you need to specify the path to the folder with video files in the form of “/Videos” – slash and quotation marks are required!)
filler_clip: (this parameter is needed for playlists, in this example it is not required and can be skipped)
extensions: (file extensions that the script should scan and find in the designated folder. mp4 and mkv are assigned by default, but ffmpeg understands a lot of formats, so if necessary, you can add new lines with the necessary extensions)
shuffle: True (move files in a folder; enabled by default – True)
*unfortunately, shuffle throws out repetitions quite often after some time, so I preferred to disable it. At the same time, the list is still shuffled, just the order does not change anymore and it is the same every cycle.
In the next text section, you can take the file name and display it over the video:
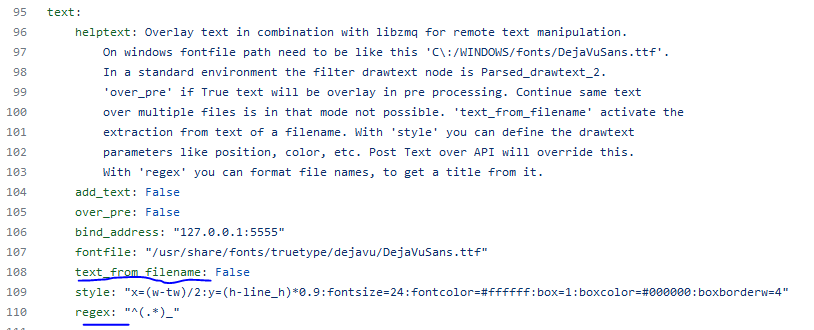
text_from_filename: True (enable this function if necessary)
By default, the title is displayed along with the file extension (e.g. Myvideo.mp4), which is not very aesthetically pleasing. This is regulated by editing the regex parameter.
It requires knowledge of regular expressions, which I do not own, but get_ked kindly suggested the correct formula (you do not need to enclose in quotation marks!):
regex: ([^\/]+)(?=.\w+$)
And the last section out:

Here you need to specify the bitrates and profiles for the encoder, similar to how it is done in OBS:
–maxrate 2000k (the desired bitrate – is the higher, the better the picture, but also more CPU load; as a guideline, you can take the values of video files by looking at their “Properties”
-bufsize 4000k (buffer size – as a rule, it is simply made twice as large as the main set bitrate).
-preset veryfast (by default, medium is set, but the “faster” the preset, the less CPU load, but also the picture is worse; as a rule, everyone recommends the value of veryfast as a compromise)
-profile:v Main (you can leave Main or change it to High / I can’t say exactly what it affects)
-ar 44100 (audio sampling rate; you can set 48000, but to save resources, I recommend leaving 44100)
-b:a 128k (audio bitrate; since our main content is music, I recommend putting 256k or 320k)
And the last thing to do is to set the streaming service and the stream key in the next line:
stream_output: >-
-f flv rtmp://localhost/live/stream

where rtmp://localhost/live/stream should be replaced with your values.
For example for Twitch: rtmp://live-jfk.twitch.tv/app/your_stream_key
Here is the official list of Twitch rtmp-servers with all the addresses (the stream key is taken in the settings section of your channel)..
Other sites are indicated in the same way. For example, the one mentioned above:
restream.io: rtmp://live.restream.io/live/your_stream_key

That’s it! It remains to save the changes and try the launch!
Running the ffplayout
To run the script, you need to go to the directory where it is located:
cd /opt/ffplayout_engineAnd enter the command line with the necessary arguments:
python3 ffplayout.py -l none -f /Videos -s now -t none -m stream
Where is (for clarity):
python3 – this is what with we want to run ffplayout.py (Python script)
-l none (where to output the log: none – directly to the console / “path” to the specified file)
-f /Videos (here you need to specify the path to the folder with the video files!)
-s now -t none (start time and playlist duration)
-m stream (output mode)
If you enter a command line from Windows Powershell (but I still recommend starting the script from Terminal in the admin panel), or if for some reason, closing the Terminal, the script stops working, then you need to add a few additional arguments (this should work):
nohup python3 -u ffplayout.py -l none -f /Playlist -s now -t none -m stream &
In general, by activating the script, everything should work and the stream will start. The ffmpeg message contains no libfdk-aac! No high quality aac… – you can ignore it, it’s all right! In the console you will see something similar:

In case something goes wrong and errors creep across the screen, do not be alarmed, but just press CTRL+C to stop the process. And see what the reason is: maybe you made a mistake somewhere with the directory indication. In any case, the log will point you to the problem place.
The problem I encountered
At my first launch, a whole string of the same error, caused by Buffer Overstuffed (or something like that, I don’t remember exactly anymore), rushed across the screen. I couldn’t figure out what the reason was (the error just wasn’t Googled, and no one had such a problem in the issues section on github). But I noticed that in the Decoder CMD (this is the ffmpeg instance that prepares the files) there are very high values – 90000k.
I don’t know by what miracle, but still I found a solution to this problem.
You need to find the stream file.py in the following directory /ffplayout_engine/ffplayout/output/stream.py and edit it.
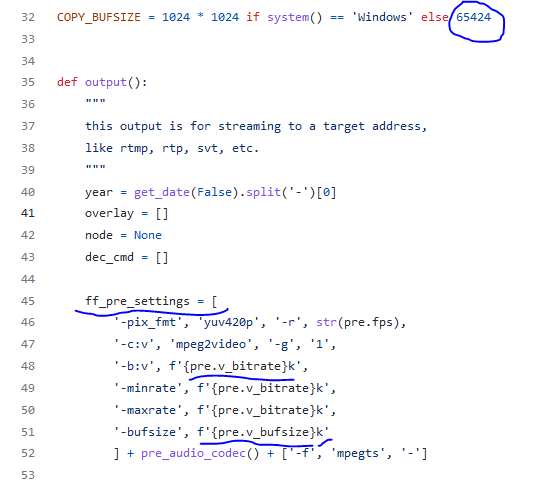
Here we are interested in the ff_pre_settings section.
In general, after some time juggling with different parameters (changing fps, video format and bitrate), I came to the conclusion that I don’t need to touch anything except two:
{pre.v_bitrate} and {pre.v_bufsize} – responsible for bitrate and buffer size.
I took the buffer size from the line above – 65424, and set the bitrate by selection (if you set the values too low, the script also refused to work, giving an error). In general, it turned out like this:
‘-b:v’, f'{20000}k’,
‘-minrate’, f'{20000}k’,
‘-maxrate’, f'{20000}k’,
‘-bufsize’, f'{65424}k’
I don’t know, of course, how technically correct this is, but after that the script started and has been working perfectly for 4 days without interruptions.
Alternative options
The above method, despite all the apparent bulkiness, is the simplest and cheapest.
Services with boxed solutions like permastream.io ask for a lot of money – the cheapest tariff costs $ 30 per month, despite the fact that it will not work to stream the video: only audio and looped gif. Or Nimble Streamer is a free plug-in to a paid one (rates start from the same $30) WMSpanel.
restream.io also offers something similar with the broadcast of pre-recorded videos, but there are strict restrictions on timing and storage size, and prices are even higher.
A common and popular way is to write your own script based on Luiquidsoap + the same ffmpeg. But here you need to have programming skills and spend time writing a script. But the possibilities and customization will reach a completely different level.
The python script PyLivestream, mentioned above is, of course, a cool thing and a good alternative to OBS, but not adapted for playing a list of files (although such a function is attached there, but it does not work as expected).
Of course, there is also an option to install a GUI on the server, and then manage the virtual machine through a remote connection to the desktop. Install OBS and everything you need. But here, first, you also need to tinker with the settings and make a remote connection via RDP (which, to be honest, did not work out for me with one attempt), and the load is likely to increase.
In the process of searching, I also came across an RTMP-Playlist, that just uses Liquidsoap, but I no longer had the need to understand it, since ffplayout was already on the air. But maybe it will be useful to someone.
A couple more little things
As you know, the maximum duration of a stream on Twitch is 48 hours. But do not worry: after this time, Twitch, without any intervention, simply reset the timer and restart the stream on its site. No additional actions will be required from you. However, sometimes it also happens that Twitch does not start, so sometimes you will have to restart manually. I have not observed such cases with Youtube, and theoretically the broadcast there can go on forever, but the video will not be saved either: if the stream is interrupted or manually stopped, there will be a video with a huge number of hours in the channel feed, but it will be impossible to reproduce it.
ffplayout can add new files to the folder without stopping the stream*, but it will not work to change the bitrate and other values on the fly. You will have to restart the script for the changes to take effect.
* in theory, this is how it should be. But practice has shown that when adding or deleting files in a folder, the script, despite the fact that it sees all the changes, does not start working quite correctly. Therefore, after the edits, it is still better to restart the script (in the terminal, you can call the last command entered by pressing the up arrow key – if you do it quickly, the stream will not be interrupted). However, it is likely that this problem will be fixed in new script updates.
How reasonable is it to bother with such a channel at all? It’s hard to say. Since the idea has been in the air for a long time, and in December 2021 I suddenly really wanted to have time to launch it before the end of the year, I decided to test the idea on a physical PC first. The launch went well and with a small, but still excitement: the audience of the main channel liked that now there is a resource for background music of my composing. Well, in general, there was some little movement, so it was decided to bring the idea to the end. So, if in doubt, then you can first drive your radio from a physical PC (not necessarily 24/7, but including from time to time), and by the end it’s up to you to decide whether to rent a VPS or not.